Knife Care: The Essential Guide for Your Commercial Kitchen

Knife Care: The Essential Guide for Your Commercial Kitchen

Knife Care: The Essential Guide for Your Commercial Kitchen

Introduction

Section 1: Why Blade TLC Matters (Your Knives Aren't Just Tools, They're Investments)

A trusty chef’s knife is more than just a sharpened hunk of metal. It’s an extension of your hand in the kitchen – a precision tool and, when cared for correctly, a culinary companion for years to come. Dedicating a little time to proper knife care might seem like extra effort, but trust us, it pays off in spades:

Sharpening knife on stone

Performance:

A well-maintained knife slices effortlessly, minimizing bruising and preserving delicate ingredients. Think clean cuts of tomato, not sad squishing.

Safety:

A dull blade sounds counterintuitive, but it’s far more dangerous! You need to apply excessive force, increasing the risk of slippage and potential cuts.

Longevity:

Replacements ain’t cheap. Good quality knives, with proper care, can last decades. Those cheap sets get dull quickly and end up as landfill waste.

Food Joy:

Cooking is simply more enjoyable when your tools work with you, not against you. Sharp knives cut down on frustrations and help you enjoy your kitchen time.

Section 2: Knife Anatomy 101 (Understanding Your Blade for Better Care)

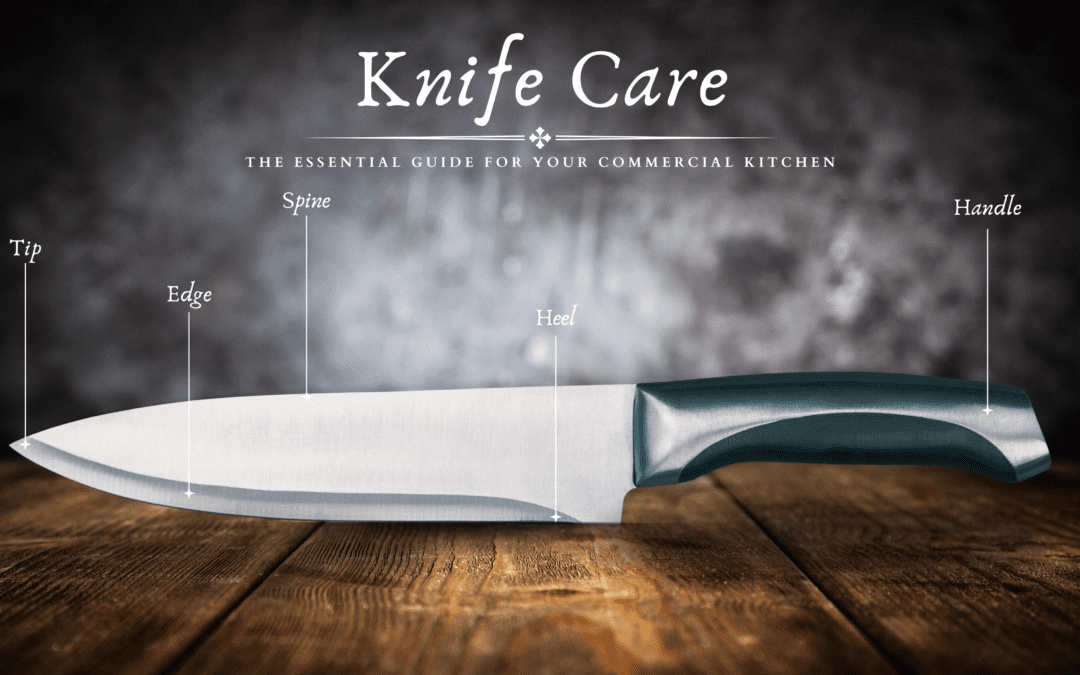
It seems obvious, but to truly master knife care, you need to understand what you’re working with. Don’t worry, no full anatomy exam – just the key parts that impact how you use and treat your knives:

The Tip:

That pointy end! Perfect for delicate precision work, like scoring or piercing. Treat it gently because tips can chip with misuse.


The Edge:

Edge of knife highlighted

This is the business end, the sharp slicing part. Blade angles and edge types vary widely, affecting what a knife is best used for.

The Spine:

Spine of knife highlighted

The thick, unsharpened top of the blade. Provides strength and balance, and sometimes has measurements printed on it (handy!).

The Heel:

Heel of knife highlighted

The widest part of the blade near the handle. Built for power cuts through tougher ingredients.

Bolster (on some knives):

Bolster of knife highlighted

Thick junction between blade and handle. This offers protection for your fingers and balance. Not all knives have this.

The Tang:

Tang of knife highlighted

This is the metal of the blade extending into the handle. A “full tang” means it goes the full length for maximum strength.

The Handle:

(Wood, plastic, etc.) Where you grip. Variety is huge! Care will depend on what your knife’s handle is made from.

Handle of knife highlighted

Why Does This Matter?

Cleaning:

You’ll understand why the bolster area needs extra attention to prevent food buildup.

Sharpening:

Blade angles matter depending on your knife’s purpose. We’ll dig into this deep later.

Respecting limits:

A delicate paring knife with a thin tang isn’t built for hacking through bones.

Section 3: Daily Care: Your Knife's Best Practices

You don’t need fancy routines to keep your knives in good shape. These daily habits might seem small, but they make a huge difference in your blade’s performance and lifespan:

Hand washing Knife

Hand Wash ONLY:

Dishwashers are brutal. The abrasive detergents, rattling around, and heat cycles will degrade your knife’s sharpness and can damage the handle. A little love with warm soapy water and a soft cloth goes a long way.

Dry Immediately:

Leaving a knife wet invites rust, even on stainless steel. Dry with a clean dish towel right after washing, paying close attention to the area where the blade meets the handle.

Don’t Soak:

Letting knives mingle dirty in a sink is a big no-no. It dulls the edge and exposes your blades to potential nicks and dings from other dishes.

Cutting Board Basics:

Cutting directly on hard countertops like granite or ceramic ruins edges fast. Always use wood or plastic cutting boards – your knives and kitchen surfaces will thank you.

No Twisting or Prying:

Knives are for controlled slicing and chopping. Using them to pry open cans or twist apart frozen items puts extreme stress on the blade and risks ruining it.

Proper Storage:

Tossing your knives haphazardly into a crowded drawer spells disaster! Dings and chips lead to quicker dulling and premature rusting. We’ll cover best storage options later.

A Note on Steel: Most blade materials are some variety of steel. Even “stainless” needs the love. Carbon steel is extra reactive, developing a unique patina over time. More on specific steels later.

Section 4: Cleaning Deep Dives (When Soap and Water Isn't Enough)

While your everyday knife care focuses on quick, preventative washes, sometimes more intensive cleaning is needed. Here’s when to deep dive and how to tackle those situations:

Dirty Knife

Stuck-On Gunk:

Happens to the best of us! Dried-on dough, caked-on sauces… don’t panic. A little soaking in warm, soapy water usually loosens stubborn debris enough for gentle scrubbing. For super tenacious buildup, a paste of baking soda and water left on the problem area for a few minutes can work wonders.

Stubborn Stains:

Some ingredients, like berries or onions, can leave their mark temporarily. A sprinkle of baking soda with enough lemon juice to form a paste works as a gentle abrasive and a natural lightener for surface stains.

Deep Grime & Rust:

In neglected blades, soaking and gentle scrubbing might not be enough. Bar Keepers Friend (powder form), with its mild oxalic acid, tackles heavy buildup with care. Severe rust might require very fine-grit sandpaper for removal, but this is risky and often necessitates professional services.

Wood Handle Woes:

Wood handles need care beyond the blade. To combat drying out, occasional treatment with food-grade mineral oil keeps them supple. Avoid storing wood-handled knives in extremely damp areas.

A note on disinfecting: Hot water and a good scrub go a long way. If concerned about pathogens (raw meat prep), a diluted bleach solution wiped off immediately is safe on stainless steel but damaging to carbon steel or reactive metals.

Section 5: Honing vs. Sharpening: Your Knives Need Both (But Not at the Same Time)

Knife care can be confusing, especially when you hear “honing” and “sharpening” used almost like they mean the same thing. But there’s a big difference, and understanding it will save your blades – and maybe your fingers too!

Chef Honing Knife

Honing: Quick Edge Tune-Up

See a chef swipe their knife along a steel rod? That’s honing. It doesn’t actually remove any metal. Think of your knife’s edge like a row of tiny teeth. With use, these teeth get bent out of alignment. Honing gently pushes them back into place, restoring that satisfying “bite”. Honing is something you can (and should!) do often.

Sharpening: It’s a Grind

Sharpening actually removes a tiny bit of metal from the blade to create a brand new, razor-sharp edge. Over time, honing alone isn’t enough, and that’s when sharpening steps in. Sharpening requires tools like whetstones, specialized electric sharpeners, or the services of a pro.

When to Hone, When to Sharpen: The Fingernail Test

Not sure if your knife is dull or just a little “off”? Try this: very lightly drag the blade’s edge across your fingernail (carefully!). If it slides without catching at all, your knife needs sharpening. If you feel a slight catch, try honing first, then retest.

How Often is Right?

  • Honing: You can hone before or after each use for maximum sharpness. It’s quick and extends the time between sharpenings.
  • Sharpening: Frequency depends on how often you use your knives and the type of steel. Most home cooks with heavily used knives can get by with 1-2 professional sharpenings per year.

Can I Sharpen My Own Knives?

Technically, yes. But if you want to keep your knives in top shape, there are a few things to keep in mind:

  • Whetstone Woes: Sharpening on a whetstone is a skill that takes practice. If you get the angle wrong, you can damage your blade.
  • Pull-Through Perils: Those cheap “pull-through” sharpeners you see are tempting but often overly aggressive, shortening your knife’s lifespan.
  • Pro-Power: For high-value knives, or if you’re nervous about DIY, a professional sharpening service is the safest bet.

Section 6: Storage Savvy (Protect Your Investment)

How you store your knives matters way more than you might think. It’s about safety, preventing edge damage, and maximizing their lifespan. Here’s what to do (and the mistakes to avoid at all costs)!

Hazard Symbol overlaid a junk drawer

The “Don’ts”

The Junk Drawer:

This is your knife’s worst nightmare! Not only is your blade banging around and dulling against who-knows-what, there’s the serious risk of cutting yourself rummaging in there.

Tossing on the Counter:

Edges get nicked, moisture from the air invites rust, and it’s an accident waiting to happen.

The “Do’s”

Magnetic Wall Strip:

Stylish AND useful! Your knives are accessible, dry, and the blades remain pristine with no contact other than the handle.

In-Drawer Block:

If counter space is tight, the slots ensure safety and minimal blade-on-blade action. Just beware of cheap wood that traps moisture.

Knife Rolls/Cases:

Perfect for pros on the move or if you own several showpiece knives. Ensure each knife has its own slot for maximum protection.

Edge Guards:

If the drawer must be your current solution, individual protective sheaths help. Not ideal long-term, but better than nothing!

Additional Notes:

  • Humidity Matters: Even stainless steel needs a stable environment. Very humid kitchens might necessitate extra vigilance against rust.
  • The “Best” Option: This depends on your kitchen setup and needs. A pro chef with precious knives will have different ideal storage than a home cook with a trusty pair.

Section 7: Telltale Signs (When Your Knife Needs Pro Help)

Even with your newfound dedication to excellent knife care, there are times when it’s best to turn to the professionals for restoration and a razor-sharp edge:

Professional Sharpening of Knives

  • Severe Nicks and Chips: Sometimes, accidents happen. A dropped knife on a tile floor or hidden bone can cause real damage to the blade. A good sharpening service can often smooth out and restore, extending the blade’s life.
  • Warping or Bending: This means the metal itself has lost structural integrity. Unfortunately, not something any kind of sharpening can fix.
  • The ‘Try This!’ Test Fails: You’ve washed, honed, and maybe even given a basic sharpening a go and… things still feel dangerously dull. Time for a professional to assess the state of your blade.
  • High-Value Knives: Your grandfather’s vintage chef knife or the Japanese blades you splurged on deserve extra TLC. Professionals will use the sharpening method most appropriate for the specific type of steel and edge profile.
  • Beyond Your Comfort Zone: Sharpening on whetstones is an acquired skill. If the thought of it intimidates you, there’s absolutely no shame in utilizing skilled sharpeners!

Where to Find Reputable Sharpeners:

  • Word of Mouth: Local butchers, culinary programs, or high-end kitchen stores often have good leads.
  • Online Search: Look for services that specialize in knife sharpening with transparent pricing. Check if they offer mail-in options (handy if your area is limited).

Final note: Even the best pro sharpening shouldn’t be done weekly. That’s where your day-to-day care and honing skills shine!


Optimize Ice Bridge Thickness

Optimize Ice Bridge Thickness

Introduction

Learn how to Optimize Ice Bridge Thickness! In the realm of commercial ice production, the ice bridge plays a pivotal role in ensuring the quality and consistency of ice cubes. An ice bridge, the slender layer of ice that forms between individual cubes, requires precise adjustment to maintain the perfect balance. Too thick, and the cubes won’t separate at harvest; too thin, and they may break apart prematurely. This article delves into the technicalities of ice bridge adjustment, offering actionable advice and manufacturer-specific instructions to optimize your ice machine’s performance.

Quick House Keeping: IMPORTANT!

Some manufactures will void your warranty for adjust or changing the ice bridge. So make sure to double check before you start changing things. There will be links to warranty pages to the manufactures we cover in this blog at the bottom.

Understanding the Ice Bridge

Optimizing Ice Bridge Thickness is crucial for the structural integrity of ice cubes during the freezing and harvesting phases. It’s formed as water freezes in a grid pattern, with each cube slightly connected by this ice bridge. The thickness of this bridge is determined by the distance between the ice-making grid and the machine’s sensor. Adjusting this distance allows you to control the bridge’s thickness, impacting the ice’s final quality.

DIY Adjustments: Proceed with Caution

While manufacturers often recommend professional servicing for adjustments, understanding the basics can empower you to make minor tweaks, especially if your warranty period has lapsed. Here’s a general guide:


  • Identify the ice thickness sensor: This component is usually located near the ice-making grid.


  • Adjust the sensor: Moving the sensor closer to the grid results in a thinner bridge, while moving it away thickens the bridge. Adjustments should be made in small increments to avoid drastic changes.


  • Test and retest: Allow your machine to complete a few ice-making cycles after each adjustment to accurately assess the impact on ice bridge thickness.

In-Depth Manufacturer-Specific Adjustment Tips

In the realm of commercial ice production, the ice bridge plays a pivotal role in ensuring the quality and consistency of ice cubes. An ice bridge, the slender layer of ice that forms between individual cubes, requires precise adjustment to maintain the perfect balance. Too thick, and the cubes won’t separate at harvest; too thin, and they may break apart prematurely. This article delves into the technicalities of ice bridge adjustment, offering actionable advice and manufacturer-specific instructions to optimize your ice machine’s performance.

Manitowoc logo

Manitowoc ice machines are known for their reliability and ease of maintenance, including bridge thickness adjustments. The key component here is the ice thickness sensor, typically controlled by an adjustable screw. We have a blog all about troubleshooting Manitowoc. To fine-tune the ice bridge thickness:


  • Locate the ice thickness sensor near the ice grid; it’s held in place by a screw.
  • To reduce the ice bridge thickness, turn the screw counterclockwise. For a thicker bridge, turn it clockwise.
  • Manitowoc recommends adjusting in quarter-turn increments to avoid over-adjustment.
  • After each adjustment, allow the machine to complete at least two full ice-making cycles to evaluate the new bridge thickness.
  • Keep in mind, unauthorized adjustments might affect warranty claims, so it’s crucial to consult the service manual or a professional if in doubt.

Hostizaki Logo

Hoshizaki’s unique approach involves a float switch instead of a direct sensor adjustment, influencing the water level and, consequently, the ice bridge thickness:

  • After accessing the interior, locate the float switch, typically a white, cylindrical component connected to the water reservoir.
  • Adjusting the float’s position up or down alters the water level for the next freeze cycle, affecting the ice bridge thickness.

Secure the float in the new position and monitor the ice over several cycles to ensure the adjustment meets your needs.

Ice-O-Matic Logo

Ice-O-Matic simplifies the adjustment process with its Water Level Adjustment Arm, providing a straightforward method to control ice bridge thickness:


  • The adjustment arm is usually located behind the sump and splash curtain inside the machine.
  • Moving the arm up decreases the ice bridge thickness, while moving it down increases it.
  • After adjustments, it’s important to let the machine run through a few cycles to assess the impact on ice quality.

Scotsman Logo

Scotsman offers a user-friendly approach to adjusting the ice bridge on their models, particularly on undercounter units like the CU0415, CU0715, and CU0920. These machines feature:


  • An electronic bridge adjustment button located on the control panel, eliminating the need for manual screw adjustments.
  • Simply pressing the “+” or “-” buttons will adjust the ice thickness.
  • It’s advisable to make small adjustments and observe the results over a few cycles to ensure the desired ice quality is achieved.

Koolaire Logo

Koolaire machines offer a direct way to adjust the ice bridge thickness through the ice thickness float switch adjuster:


  • This adjuster is typically found beneath the reservoir, often on the left side.
  • Turning the adjuster clockwise increases the ice bridge thickness, whereas turning it counterclockwise reduces it.
  • Koolaire recommends aiming for a bridge thickness of about 1/8-inch for optimal performance.
  • As with other machines, it’s vital to allow a few ice-making cycles post-adjustment to verify the effectiveness of your tweaks.

Conclusion

Adjusting the ice bridge thickness in your commercial ice machine can significantly impact the quality and consistency of the ice produced. By understanding the specific adjustment mechanisms provided by manufacturers like Manitowoc, Scotsman, Hoshizaki, Ice-O-Matic, and Koolaire, you can ensure your machine operates optimally. Remember, while making these adjustments, it’s crucial to proceed with caution, respect warranty terms, and seek professional help if unsure.

Warranty Links

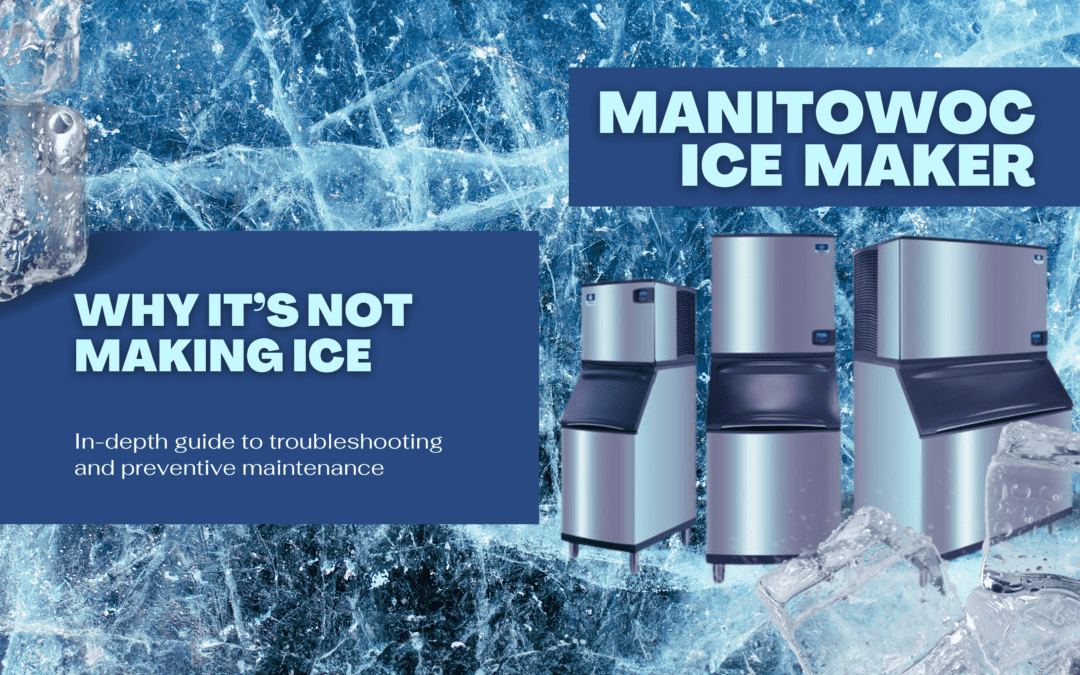
Manitowoc Ice Maker: Why It’s Not Making Ice

Manitowoc Ice Maker: Why It’s Not Making Ice

Introduction

Navigating through the chilly waters of ice machine maintenance? If your Manitowoc ice maker is giving you the cold shoulder by not producing ice, you’re in the right place. This guide is packed with insights from the ultimate troubleshooting manual, ensuring your machine gets back to its ice-making glory in no time.

Safety First: Unplug Your Manitowoc Ice Machine

Before you dive into the heart of troubleshooting, let’s talk safety. The golden rule? Always unplug your Manitowoc ice machine before you start poking around. This simple step is your best bet in avoiding any unwanted zaps and protecting the intricate inner workings of your ice-making buddy. Whether you’re cleaning, resetting, or replacing parts, pulling the plug is your first move.

Understanding Manitowoc Ice Machines

Manitowoc is renowned for its high-quality and reliable ice production. They offer a variety of models like Modular, Undercounter, and Countertop ice machines, each tailored for specific needs. Knowing your machine’s type and model can greatly aid in troubleshooting and maintenance.

Common Issues and Solutions

Power and Water Supply Checks

Actionable Solutions: First, make sure your ice machine is securely plugged into a functioning power outlet. If there’s no power, inspect your establishment’s circuit breaker or fuse box for any tripped breakers or blown fuses and reset or replace them as necessary. For water supply, check the inlet valve and ensure it’s free from any blockages or clogs, and verify that the water line is not kinked or frozen, which could restrict the flow to your machine.

Water Filter Maintenance

Actionable Solutions: A dirty or clogged water filter can significantly impact your machine’s ice production. Locate your machine’s water filter, typically found on the incoming water line, and check the manufacturer’s guidelines for replacement intervals. If it’s time, replace the filter with a Manitowoc-approved model to ensure optimal water flow and cleanliness.

Evaporator Plate Cleaning

Actionable Solutions: The evaporator plate is essential for ice formation and must be kept clean and free of scale buildup. Turn off and unplug the machine for safety, then use a Manitowoc-approved nickel-safe cleaner to gently clean the plate according to the product instructions. Rinse thoroughly with clean water and dry before turning the machine back on.

Resetting the Machine

Actionable Solutions: If your machine is experiencing minor electronic glitches, a reset might be the quick fix you need. Safely unplug your machine and wait for about 10 seconds. Reconnect the power and turn on the machine using the power switch. A successful reset is often indicated by a blue light or the initiation of a standard start-up sequence.

Sensor and Control Board Inspection

Actionable Solutions: Dirty or malfunctioning sensors can lead to ice production issues. Carefully clean all machine sensors with a soft, damp cloth to remove any dirt or buildup. For the control board, visually inspect for any signs of damage or loose connections. If you’re uncomfortable handling electrical components or if damage is evident, it’s best to consult with a professional technician for repairs.

Condenser Maintenance

Actionable Solutions: A clean condenser is crucial for efficient machine operation. Turn off and unplug the machine, then use a soft brush or vacuum with a brush attachment to gently clean the condenser fins, being careful not to bend them. If the condenser appears excessively dirty or damaged, professional cleaning or repair may be necessary.

Replacement Parts and Maintenance Tips

Manitowoc ice machines might need replacement parts over time, such as control boards, motors, or evaporators, to stay in peak condition. PartsFe offers a wide selection of Manitowoc parts, ensuring you get high-quality components for your machine.

Regular cleaning and sanitizing are non-negotiable for mold prevention and ensuring hygienic ice production. Additionally, inspecting and replacing water filters, cleaning the condenser, and monitoring ice quality are essential practices for maintaining your ice machine.

Preventative Maintenance

Preventive steps are key to avoiding future issues. Regular cleaning, descaling, and professional servicing can keep your machine running smoothly. Pay attention to the condenser, ensure proper water filtration, and replace worn parts as needed.

Troubleshooting Specific Issues

Close-up view of a person holding a thin and hollow ice cube, indicating potential issues with ice maker functionality.

Thin or Hollow Ice Formation

In-Depth Solutions:

    • Water Flow and Pressure: Begin by verifying that your establishment has adequate water pressure feeding into the ice machine. Low water pressure can lead to incomplete ice cube formation. A pressure gauge can be helpful in this assessment.
    • Water Inlet Valve Inspection: Examine the water inlet valve for any signs of wear, damage, or blockage. If the valve is not fully opening, it can restrict water flow, resulting in thin or hollow ice. Cleaning or replacing the valve may be necessary.
    • Water Distribution System: Ensure that the water distribution system over the evaporator plate is functioning correctly and is not clogged. Proper distribution is crucial for even ice formation. Clean any blocked nozzles or channels to restore full coverage.

Water Leakage Issues

In-Depth Solutions:

    • Water Inlet Valve: Check the water inlet valve for leaks. A faulty valve can cause water to drip continuously into the machine, leading to leaks. Replacing the valve may resolve the issue.
    • Inspecting Supply and Drain Lines: Carefully inspect all water supply and drain lines connected to your ice machine for signs of leakage, wear, or damage. Even small cracks or loose connections can lead to significant water leakage. Repair or replace lines as needed.
    • Ice Bin Alignment: Ensure the ice storage bin is properly aligned under the ice machine to catch ice without spillage. Misalignment can cause water to leak out from the sides.

Ice Thickness Probe Calibration and Cleaning

In-Depth Solutions:

    • Cleaning the Probe: Over time, the ice thickness probe can become coated with mineral deposits, affecting its ability to accurately gauge ice thickness. Gently clean the probe with a soft cloth and a Manitowoc-approved cleaning solution. Rinse thoroughly and dry before reattaching.
    • Calibration: Follow the manufacturer’s instructions to calibrate the ice thickness probe. Incorrect calibration can lead to ice that is too thin or too thick. If you’re unsure of how to calibrate the probe correctly, it may be wise to consult with a Manitowoc technician.
    • Proper Alignment: Ensure that the ice thickness probe is correctly aligned with the evaporator plate. Misalignment can cause the machine to misread ice thickness, leading to improper ice production. Adjust the probe’s position as necessary according to the Manitowoc service manual.

When to Seek Professional Help

If you’ve tackled the basics and your machine is still not performing, it’s time to call in a Manitowoc professional. They can provide deeper diagnostics and address complex issues that might be beyond the scope of routine maintenance.

Conclusion

Armed with “The Ultimate Troubleshooting Guide For Manitowoc Ice Machine” and the tips shared here, you’re well-equipped to tackle common ice maker issues. Regular maintenance, coupled with timely troubleshooting, can ensure your Manitowoc ice maker remains a reliable ally in your culinary adventures.
Cost of Opening a Restaurant in Idaho

Cost of Opening a Restaurant in Idaho

Cost of Opening a Restaurant in Idaho

Opening a restaurant can be incredibly rewarding. But let’s face it, the initial financial investment can feel daunting. Fear not, fellow Idaho foodie entrepreneur! This guide will cover the cost of opening a restaurant in Idaho.

Initial Costs: Setting the Stage

Cityscape skyline, representing location choices for your restaurant. 

Location, Location, Location: This age-old adage reigns true. Renting a space in a major city like Boise can range from $2,000 to $10,000 per month, while purchasing can set you back anywhere from $150,000 to $500,000. Consider exploring cost-effective options like food halls or pop-up shops for a budget-friendly start. (Source: National Restaurant Association)

Hammer and wrench, symbolizing construction and renovation costs.

From Brick to Bite: Construction and renovation costs can vary greatly depending on the complexity of your vision and the existing condition of your space. Budget anywhere from $50,000 to $200,000, and remember, prioritizing essential upgrades initially can help manage costs.

Government building, representing permits and licenses required for restaurants.

Permits & Licenses: Navigating the bureaucratic landscape requires obtaining permits and licenses specific to your location and food service type. Expect to spend between $5,000 and $10,000 to ensure you’re operating legally. (Source: Idaho SBDC) Check out our blog specifically about Permits and Licenses – Here

Stuff and Things: Equipping Your Restaurant

Kitchen Arsenal: The heart of your operation, kitchen equipment costs can range from $25,000 to $100,000. Consider your menu, explore multi-purpose equipment options, and don’t underestimate the potential savings of used equipment.

Tabletop: Don’t Let It Be Your Afterthought:  Sure, furniture prices can fluctuate, but listen up: strategic tabletop planning is a game-changer. Our tabletop ninjas aren’t just furniture connoisseurs, they’re plate whisperers, silverware sorcerers, and napkin necromancers (okay, maybe not the last one). They’ll help you ditch the generic and craft a cohesive tablescape that reflects with your unique vibe. Minimize unnecessary costs (because who needs mismatched mugs?) and maximize impact with their expert guidance. Remember, your guests see, touch, and feel your tabletop – make it unforgettable! Don’t wait until the end, invest in their magic for a winning restaurant atmosphere. We can cater to your budget. Cost varies greatly, but definitely get us involved early for a better outcome.
Computer monitor icon representing restaurant technology and point-of-sale systems. 

Tech Savvy Service: Invest in a point-of-sale system and other technology tools to manage your restaurant efficiently. Budget $5,000 to $20,000, considering starting with basic systems and upgrading later.

Fueling Your Business: Operational Costs

Shopping cart overflowing with fresh ingredients, representing food inventory cost. 

Food Inventory: This can be your biggest ongoing expense, accounting for 28-32% of your total revenue. Allocate $10,000 to $50,000 initially, prioritizing cost-effective ingredient alternatives and tracking your food cost percentage regularly.

Calendar icon with dollar signs, symbolizing employee payroll expense.

Your Culinary Crew: Employee payroll is another significant expense. Depending on location, wages, and staff size, expect to spend $50,000 to $200,000 per year. Utilize resources like Payscale to estimate salary ranges for different roles.

Light bulb icon with dollar signs, representing utility costs.

Keeping the Lights On: Monthly utilities like electricity, water, and gas can cost anywhere from $1,000 to $5,000. Implementing energy-saving measures can help reduce these costs in the long run.

Loudspeaker with social media logos, representing restaurant marketing.

Marketing Mastery: Spreading the word is crucial. While free resources like social media and Google Business Profile are powerful tools, consider allocating some budget for paid advertising to reach a wider audience.

Shield with checkmark, signifying restaurant insurance protection.

Safeguarding Your Dream: Protect your business with insurance policies. Depending on your needs, expect to spend $2,000 to $25,000 annually.

Brain icon with gears, representing expert guidance for restaurants.

Professional Support: Legal, accounting, and other professional services can provide valuable guidance, but their costs vary based on your specific needs and scope.

Remember:

  • These are estimated ranges. Specific costs will vary depending on your unique restaurant concept, location, and size.


  • Unexpected expenses can arise, so factor in a buffer of 10-20% in your budget for peace of mind.


  • Explore financial assistance options like Idaho-specific loans or grants tailored for restaurant startups. (Source: Idaho Department of Commerce)
What you should know before opening a restaurant in Idaho

What you should know before opening a restaurant in Idaho

Comprehensive Guide to Opening a Restaurant in Idaho

Introduction:

Have you ever dreamt of the aroma of sizzling steaks wafting through your own restaurant, the clinking of glasses filled with laughter, and the satisfaction of creating a culinary haven for your community?

If you’re an aspiring restaurateur in Idaho, transforming that dream into reality might seem like a complex recipe with unfamiliar ingredients. Fear not, culinary adventurer! This comprehensive guide is your trusted sous chef, whisking away the confusion and guiding you through each crucial step of opening a restaurant in Idaho.
From securing the right licenses and permits to navigating unique health and safety regulations, we’ll demystify the process and ensure your culinary venture starts on a firm and flavorful foundation. Whether you envision a cozy bistro brimming with warmth, a lively gastropub pulsating with energy, or a family-friendly pizzeria bursting with laughter, this guide equips you with the knowledge and confidence to navigate the journey with ease. So, are you ready to turn up the heat and make your restaurant dream a delicious reality? Let’s get cooking!

Laying the Legal Bricks: Building a Strong Foundation for Your Idaho Restaurant

Before your culinary creations tantalize taste buds, establishing a solid legal foundation is paramount. This initial phase might seem technical, but worry not! We’ll break down the key steps into bite-sized pieces, ensuring your restaurant operates smoothly and compliantly from day one.

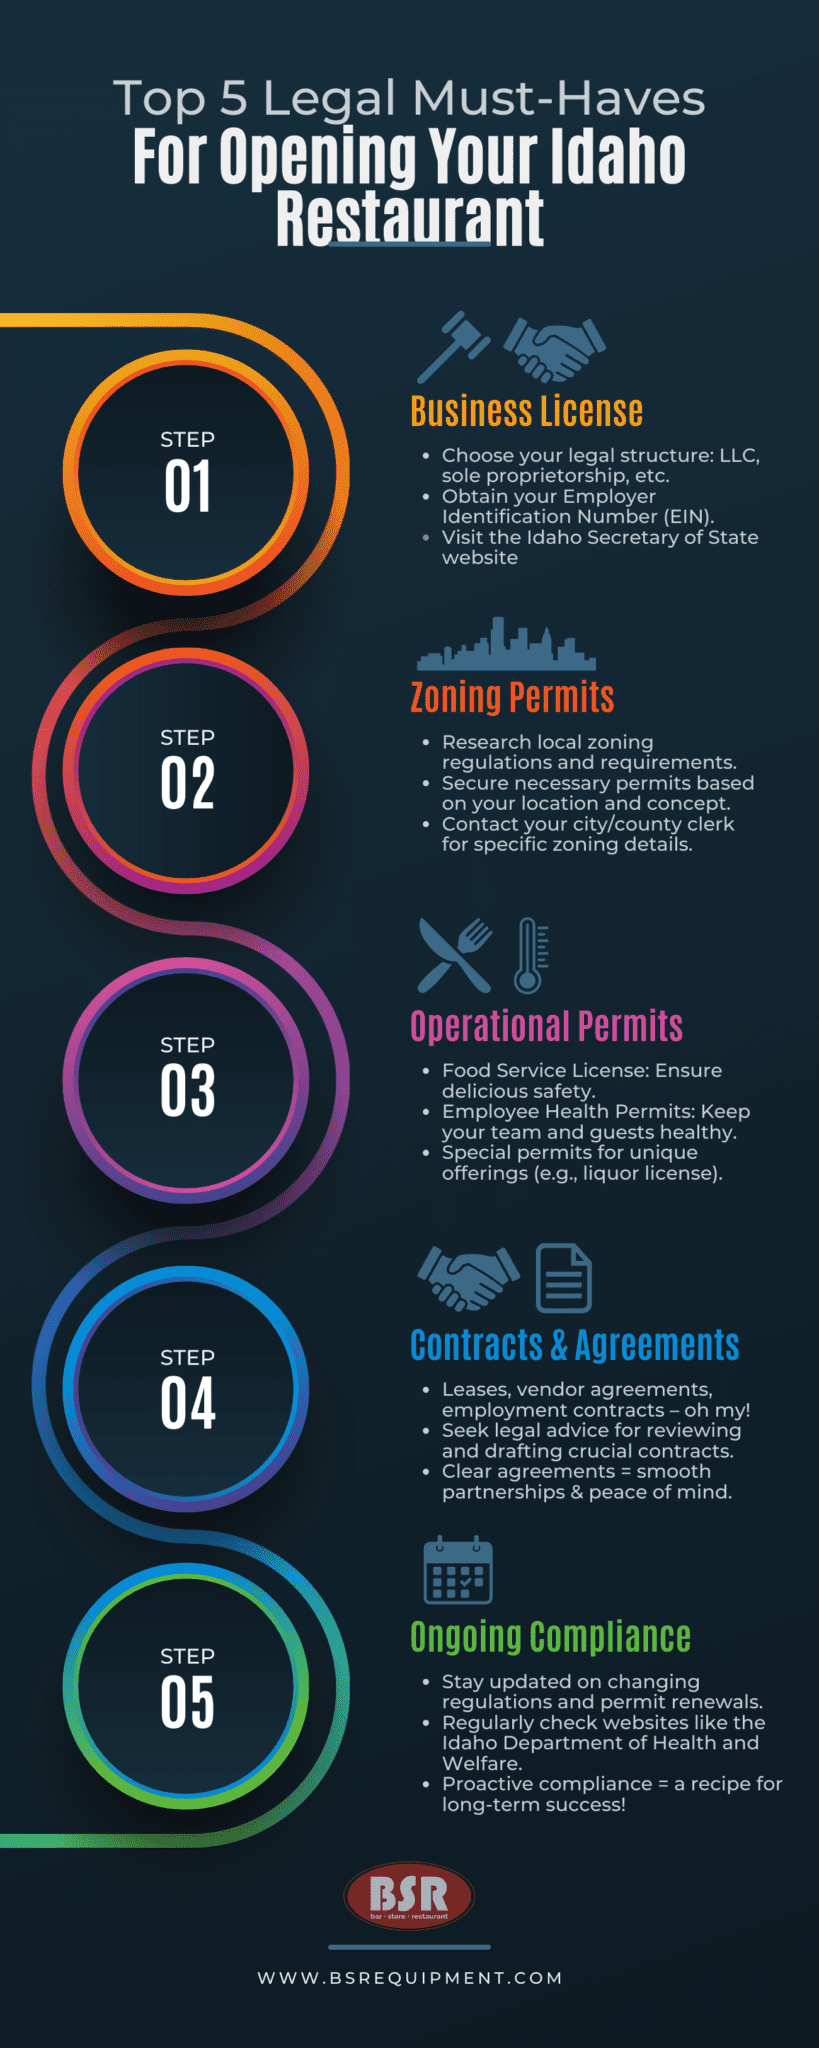
Step 1: Business License – Your Gateway to Operation

Think of your business license as the official handshake with the state of Idaho, acknowledging your right to operate. Head to the Idaho Secretary of State’s website, where you’ll choose a unique business name and register your chosen business entity (sole proprietorship, LLC, etc.). Remember, if you plan to hire employees, obtaining an Employer Identification Number (EIN) from the IRS becomes crucial for your federal tax responsibilities. This step might seem technical, but don’t fret! The Secretary of State website offers clear instructions and helpful resources to guide you through the process.

Step 2: Zoning Permits – Ensuring Harmony with Your Surroundings

Every neighborhood has its own unique character, and zoning regulations help maintain that harmony. Before finalizing your restaurant location, make sure it aligns with permitted uses for the zone. Contact your local city or county clerk to understand any specific zoning requirements or permits needed for your chosen spot. This proactive approach ensures you won’t encounter unexpected roadblocks later on.

Infographic illustrating the five key legal steps for starting a restaurant in Idaho, including business licensing, zoning permits, operational permits, contracts and agreements, and health and safety regulations.

Equipping Your Kitchen: Operational Permits for a Smooth & Compliant Restaurant

Now that your legal foundation is rock-solid, let’s equip your culinary haven with the essential operational permits. Remember, these permits ensure your restaurant functions smoothly and adheres to crucial safety and health regulations, protecting both your patrons and your business.

  1. Certificate of Occupancy: Your Gateway to Serving Guests

Imagine the aroma of sizzling steaks wafting through the air, but wait! Before welcoming your first guest, securing a Certificate of Occupancy (CO) is mandatory. This document verifies that your premises meet all local safety and building codes, including fire safety, accessibility, and structural integrity. Obtaining a CO typically involves inspections by relevant authorities, so plan ahead and factor in potential lead times.

  1. Food Service License: Safeguarding Deliciousness

Foodborne illnesses are no recipe for success. That’s why a Food Service License is a non-negotiable ingredient in your restaurant’s operation. This permit signifies that your kitchen and food handling practices comply with stringent health regulations set by the Idaho Department of Health and Welfare. Expect inspections to assess food storage, preparation, and sanitation procedures, ensuring your culinary creations are as safe as they are delicious.

  1. Employee Health Permits: A Team Effort for Food Safety

Protecting your patrons’ health extends beyond the kitchen walls. Every food handler on your team, from chefs to servers, must possess a valid Employee Health Permit. This permit confirms they’ve undergone essential food safety training, equipping them with the knowledge to prevent foodborne illnesses and maintain impeccable hygiene standards. Remember, ongoing training is crucial for permit renewal, so prioritize continuous education for your food handling staff.

Additional Operational Considerations:

While the above form the core operational permits, your specific needs might require additional licenses. Consider factors like:

  • Signage Permits: Ensure your eye-catching restaurant signage complies with local regulations.

  • Music and Entertainment Licenses: Planning live music or DJs? Secure the necessary permits to avoid any legal hiccups.

  • Outdoor Seating Permits: Dreaming of a charming patio dining experience? Obtain the necessary permits to set up tables and chairs outdoors.

Remember: This list is not exhaustive. Always consult your local authorities for the most up-to-date and accurate information on required permits specific to your location and chosen restaurant concept.

By diligently securing and maintaining these operational permits, you’ll lay the foundation for a successful and compliant restaurant journey in Idaho. Now, let’s explore some additional permits that cater to specific needs and elevate your restaurant experience.

Beyond the Basics: Catering to Unique Needs with Special Permits

Your restaurant should reflect your unique vision and offerings. While the core operational permits ensure a smooth and compliant foundation, some special considerations might require additional permits, depending on your aspirations. Let’s explore three scenarios:

1. Waste Management with a Permit:
Imagine delicious dishes being created, but what about the inevitable leftovers and packaging? To ensure proper waste disposal and avoid hefty fines, secure a Dumpster Placement Permit. This permit specifies the size, location, and type of dumpster allowed on your property, ensuring responsible waste management that aligns with local regulations.

2. Valet Parking: Convenience with a Permit:
Envision offering valet parking for a touch of luxury and convenience. While this elevates your customer experience, remember to obtain a Valet Parking Permit. This permit authorizes valet operation and outlines requirements for insurance, training, and designated parking areas. Remember, ensuring the safety and security of customers’ vehicles is paramount.

3. Pool Tables: Fun with a Permit:
Picture the laughter and friendly competition around a pool table in your restaurant. If you envision this element, acquiring a Pool Table Permit is crucial. This permit ensures adherence to specific regulations regarding table placement, number of tables allowed, and any age restrictions that might apply. Remember, responsible operation and compliance are key to offering this recreational activity seamlessly.

Remember: This list serves as a starting point. Always consult your local authorities for the most current and accurate information on permits specific to your chosen add-ons and your restaurant’s location.

By carefully considering these special permits and navigating the process diligently, you can unlock unique offerings that enhance your restaurant’s character and cater to your customers’ diverse needs. With a comprehensive understanding of both core and special permits, you’re well-equipped to build a thriving and compliant restaurant in Idaho.

Planning & Compliance: Your Recipe for Long-Term Success

Opening a restaurant is an exciting venture, but building a sustainable and compliant business requires meticulous planning and ongoing commitment. Let’s explore how to navigate these crucial aspects:

Planning Ahead: A Well-Spiced Strategy

Before diving into permit applications, take a step back and strategize. Research your target market, develop a detailed business plan, and estimate startup costs. This foresight will guide your permit needs and ensure you’re well-equipped for operational challenges. Remember, planning also involves understanding renewal timelines for your permits, ensuring continuous compliance throughout your restaurant’s journey.

Embrace Technology: Streamlining Compliance

Gone are the days of paper trails and manual tracking. Many states, including Idaho, offer online resources and portals to streamline the permit application and renewal process. Utilize these online tools to your advantage, as they can save you time, reduce errors, and provide easy access to permit information and renewal deadlines.

Building Strong Relationships: Partnering with Experts

Remember, you don’t have to embark on this journey alone. Consider partnering with professionals like consultants or attorneys specializing in the Idaho restaurant industry. Their expertise can guide you through complex regulations, answer specific permit-related questions, and prevent costly missteps. Building strong relationships with local authorities and inspectors can also prove invaluable, promoting open communication and fostering a collaborative approach to compliance.

Embrace Change: Adapting to Evolving Regulations

The world of regulations isn’t static. Stay informed about potential changes to Idaho’s food safety, health, and business licensing requirements. Regularly checking websites like the Idaho Department of Health and Welfare and your local city/county government portals will ensure you’re operating within the latest legal framework.

Conclusion: Your Culinary Dream Awaits!

Opening a restaurant in Idaho is an exciting yet complex endeavor. By following this comprehensive guide, understanding the essential permits, and prioritizing thorough planning and ongoing compliance, you’ll navigate the process with confidence. Remember, this guide serves as a roadmap, and seeking professional guidance is always recommended. Now, go forth and turn your culinary dream into a thriving reality in the heart of Idaho!

Additional Resources:

Idaho-Specific:

• Idaho Department of Health and Welfare Food Safety Program: Here (Provides detailed information on Idaho’s food safety regulations, licensing requirements, and training programs.)

• Idaho Secretary of State Business Registration: Here (Offers step-by-step guidance on registering your business and obtaining an EIN.)

• Business.Idaho.gov Licenses & Permits: Here (Comprehensive searchable database of all state and local business licenses and permits in Idaho.)

National Resources:

• National Restaurant Association: Here (Industry association providing resources, advocacy, and support for restaurants nationwide.)

• Food and Drug Administration (FDA) Retail Food Protection: Here (Offers guidance on federal food safety regulations and best practices.)

• National Restaurant Association ServSafe Food Safety Training: Here (Nationally recognized food safety training program for restaurant employees.)

Which Refrigerator is Right for My Restaurant

Which Refrigerator is Right for My Restaurant

What Refrigerator Should I Get for my Restaurant?

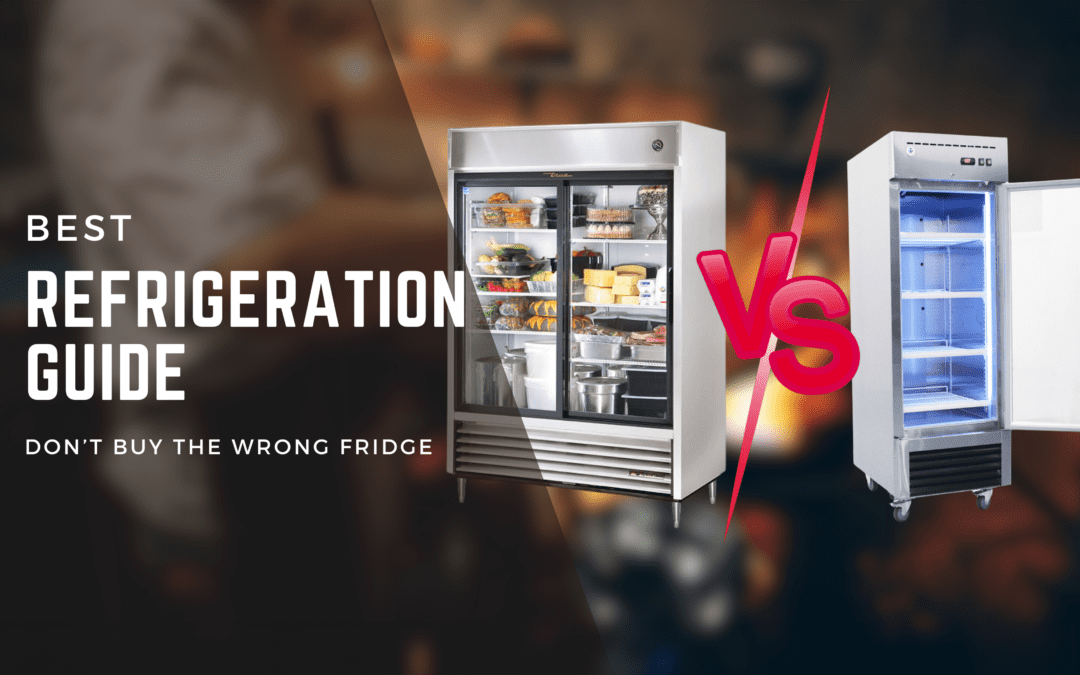
Selecting the ideal commercial refrigerator for your restaurant hinges on understanding key factors: the available space, desired temperature settings, the primary function based on your menu, the unit’s size to accommodate your inventory, and the door style that balances accessibility with energy efficiency. This guide simplifies these considerations, helping you make an informed choice that aligns with your kitchen’s demands and regulatory standards.

Introduction: Navigating the Cold Truth of Commercial Refrigeration

Choosing the correct commercial refrigerator is a significant decision that impacts the efficiency, food safety, and customer satisfaction of your restaurant. The right unit seamlessly supports your kitchen’s operations, while the wrong one can be a source of ongoing frustration and unnecessary expense. This guide offers a no-frost, in-depth look at what you should consider when selecting a refrigerator, ensuring that your choice is as fresh as your produce.

Refrigerator Features Decoded: A Closer Look

Construction: The Core of Longevity and Reliability

The build of your refrigerator dictates how it will stand up to the daily wear and tear of a busy kitchen.

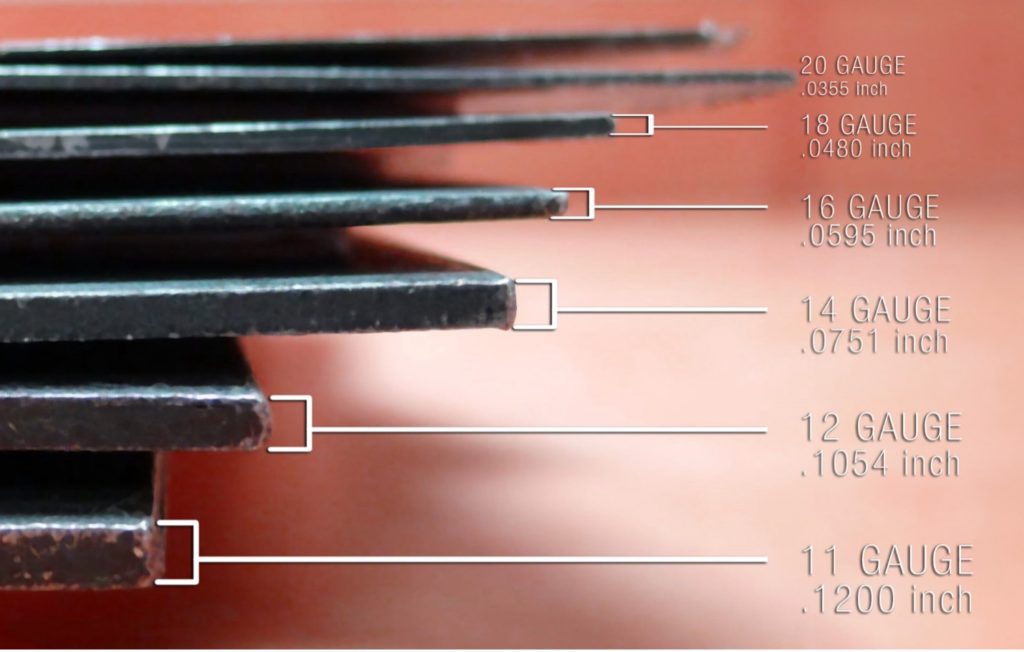
Material Quality: High-grade stainless steel, typically ranging from 14 to 18 gauge, offers resistance to dents, rust, and the harsh conditions of a commercial kitchen. This material is also non-porous, which inhibits the growth of bacteria and makes it easier to clean and sanitize.

Insulation and Energy Efficiency: Choosing the Best Barrier for Your Chilled Goods

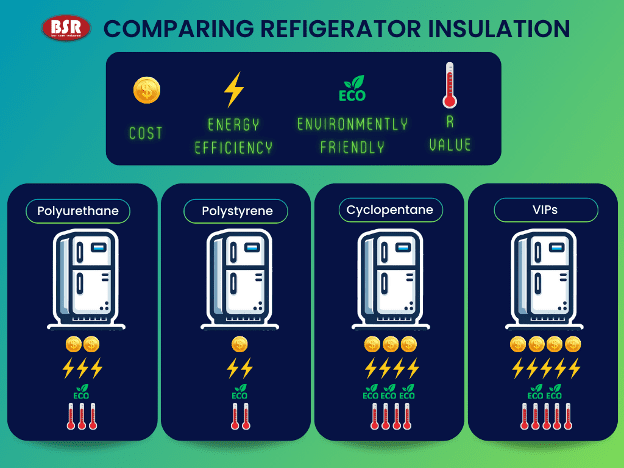
While polyurethane foam is the industry standard for commercial refrigeration insulation due to its high R-value and thermal retention capabilities, it’s by no means the sole player in the game. Let’s explore the insulating landscape to ensure you make an informed choice that contributes to your refrigerator’s energy efficiency and operational cost-effectiveness.

Polyurethane Foam Insulation:
As mentioned, polyurethane foam is prevalent in the industry, and for good reason. Its closed-cell structure creates a high R-value per inch, providing excellent thermal efficiency which keeps the interior of your refrigerator consistently cold without overworking the compressor.

Alternative Insulation Options:

Polystyrene: Another option is polystyrene, sometimes used in less demanding applications. While it offers a lower R-value compared to polyurethane, it can be a cost-effective solution for certain types of refrigeration needs.

Cyclopentane Foam: This is an eco-friendlier insulation alternative, with a lower global warming potential than other foams. It still provides a high R-value, comparable to polyurethane, making it an excellent choice for businesses looking to reduce their environmental impact.

Vacuum Insulation Panels (VIPs): For those seeking the latest in insulation technology, vacuum insulation panels offer superior insulation in a thinner profile than traditional foam. This can increase storage space within the same external dimensions of the unit. However, VIPs are generally more expensive and may not be necessary for all operations.

 Cooling System: The Pulse of Your Kitchen’s Efficiency

The cooling system is responsible for maintaining a consistent and safe temperature for food storage.

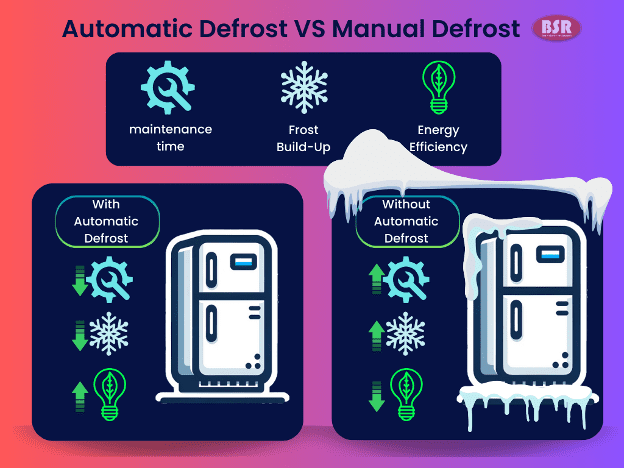
Defrosting Features: Automatic defrost systems can save labor and prevent the build-up of ice, which can insulate and reduce efficiency. Adaptive defrost controls only defrost as needed, enhancing the energy efficiency of the unit, but this does add cost. Something to keep in mind.

Ventilation and Consistent Cooling: Good airflow design is essential for even cooling throughout the unit. This prevents the development of warm spots that can compromise food safety. Fans should distribute cold air evenly, and the design should prevent the fan from blowing directly on food, which can cause dehydration and freezer burn.

Energy Consumption: Energy Star-rated refrigerators are tested to ensure they meet strict energy efficiency guidelines. Although these models might come with a higher upfront cost, they often result in significant savings over the long term. Models that use eco-friendly refrigerants, like R-290, also offer a lower global warming potential compared to traditional refrigerants.

Storage Capacity: The Smart Use of Space

Optimal use of space in a commercial refrigerator can lead to a more organized kitchen and better food quality control.

Shelving Layout: Adjustable and removable shelves offer flexibility to store different sized items efficiently. Epoxy-coated shelves resist corrosion from spills and are easier to clean than uncoated metal. Consider sliding shelves for easier access to items at the back, reducing the need to reach over or move other products.

Interior Dimensions: Look for a refrigerator that can handle the full-size sheet pans used in your kitchen, and ensure the interior width and depth accommodate your largest items without overcrowding. This reduces the time staff spend organizing and retrieving items, streamlining your kitchen operations.

Smart Design Features: Features such as split doors can reduce energy loss by limiting the amount of cold air that escapes when doors are opened. Glass doors can increase visibility, reducing the need to open doors just to check contents. LED lighting provides better visibility and consumes less energy than traditional bulbs.

Warranty and Support: Your Assurance of Quality and Service

A strong warranty and reliable support reflect the manufacturer’s trust in their product and provide you with assurance and protection.

Understanding Warranty Terms: A comprehensive warranty should cover parts and labor for at least a few years. For example, an industry-leading 6-year parts and labor warranty suggests a high level of confidence in the product’s durability and performance.

Evaluating Customer Support: Look for brands with a reputation for excellent customer service. This means accessible technical support, helpful customer service representatives, and a track record of solving issues efficiently.

Parts Availability: The best warranty is the one you never have to use, but should you need repairs, parts should be readily available. Some brands guarantee parts availability for several years after purchase, minimizing potential downtime.

Service Network: A widespread and responsive service network is crucial, especially for restaurants in less metropolitan areas. Check if the brand has certified technicians in your area who can provide timely and effective service.

Balancing Act: Performance vs. Cost

Performance: The Non-Negotiables
When it comes to performance, certain features cannot be compromised:

Temperature Uniformity: A high-performing refrigerator maintains a uniform temperature, which is essential for food safety. Advanced models feature digital temperature controls for precise settings.

Recovery Time: After the door opens and closes, the unit should quickly return to the set temperature to ensure food safety. Models with powerful compressors and efficient design recover faster, keeping your food at consistent temperatures even during high-traffic periods.

Noise Level: The operational noise of a refrigerator can impact the ambiance of your kitchen. Units designed with quieter compressors enhance the working environment for your staff.

Cost: Understanding the Investment Cost is more than the price you pay at purchase:

Upfront Price: This is just the beginning. While a lower-priced unit might be tempting, consider the build quality and features you may be sacrificing.

Energy Consumption: The more energy-efficient a refrigerator is, the more you save on utility bills. Look for models with lower energy consumption to enjoy long-term savings.

Maintenance: Consider the cost and frequency of maintenance required to keep the unit in top condition. A cheaper refrigerator that requires frequent repairs can become more expensive over time.

Flexible Financing Options with BSR: Understanding that every restaurant has unique financial needs, BSR proudly offers in-house financing options designed to ease the investment in quality refrigeration. Our financing solutions are tailored to accommodate your budget, allowing you to secure the equipment you need now while managing your cash flow effectively over time. With BSR’s financing, you can preserve your capital for other critical business operations and enjoy the benefits of the latest refrigeration technology without the burden of a one-time expense. Our goal is to partner with you in your growth by providing financial flexibility that aligns with your business’s timeline and budgetary requirements.
Financing options are subject to credit approval

The Final Choice: Making an Informed Decision

Comparing Models: A Side-by-Side Look

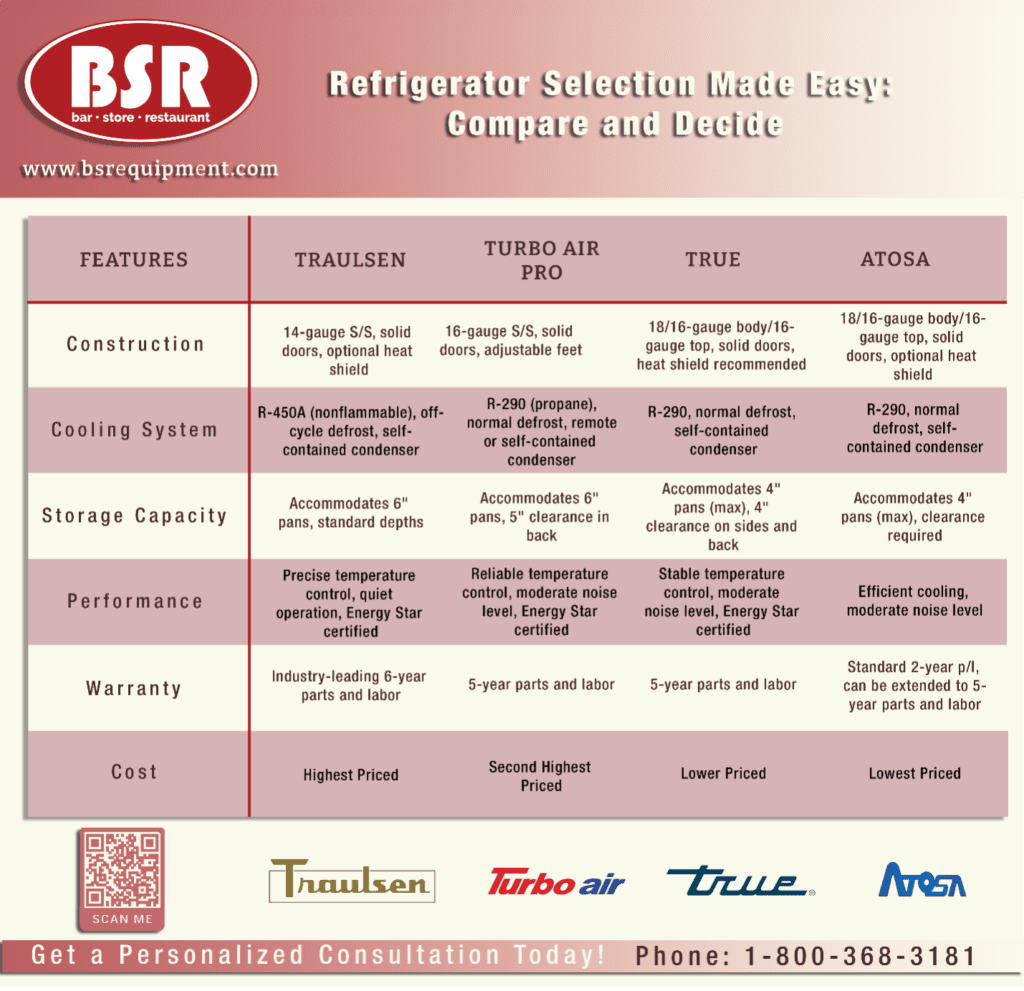
Armed with knowledge about construction, cooling systems, and warranty offerings, you can now use our comparison chart to make an informed decision. This chart highlights the differences between various models and can be a practical tool in your selection process, but is not comprehensive.

Interactive Questionnaire

If you would rather take an interactive questionnaire to help narrow down your options you can use this one we built Interactive Questionnaire

The Role of Personalized Consultation

While research is invaluable, sometimes the best choice can be made with the support of experienced professionals. Our team at BSR is dedicated to understanding your restaurant’s specific needs and guiding you to the refrigerator that best matches your operational requirements and budget. Call us at 1-800-368-3181 to reach any of our locations. We service all of Idaho and parts of Washington and Utah.

Conclusion: A Partner in Your Restaurant’s Success

The right commercial refrigerator is out there, and it’s more than a box that keeps things cold—it’s an investment in your restaurant’s operational excellence and customer satisfaction. By carefully considering the features, performance, and costs, you can make a choice that supports your restaurant’s growth.

Remember, the choices you make now will reverberate through your kitchen for years to come. Whether you prioritize state-of-the-art features, eco-friendliness, or long-term savings, ensure that your selection aligns with both your culinary aspirations and your business strategy.

Take the next step towards optimizing your kitchen’s efficiency. Contact BSR today for a consultation that’s as tailored as your menu. Dial 1-800-368-3181 or explore our solutions here. Let us help you find the refrigeration system that becomes the heart of your bustling kitchen.