Transitioning Your Food Business from Summer into Fall
Photo credit Innovo Kitchen.
Transitioning Your Food Operations from Summer into Fall
As the warm days of summer give way to the crisp air of fall, restaurant owners are about to face a pivotal moment of transformation. Instead of an inconvenience or a hassle of extra work, however, it should be greeted as an opportunity to refresh business strategies and regenerate what may be a lull in business especially as growth tends to become stagnant or excitement dulled over time. With the new season here, or just around the corner anyway, they must prepare for the changes that come with the change, accounting for everything from menu offerings to customer traffic.
Seasonal transitions bring fluctuations in customer preferences, menus, and even staffing needs. At BSR Design & Supplies, we’re here to offer our most sound tips to help the community of restaurant owners and all other food-operational professionals make the most of this provisional point.
1. Adjust Your Menu to Reflect Fall Flavors
The changing of seasons offers the perfect occasion to refresh your menu with ingredients and dishes that align with fall’s rich, hearty flavors. As the temperature cools, diners often seek out comfort foods that evoke warmth and coziness. Adapting your menu to highlight seasonal produce and bold flavors will not only appeal to your customers but also keep your offerings fresh and relevant, giving people a reason to continuously check back in their curiosity to stay current with rotating specials.
Our Recommended Strategies:
- Emphasize fall ingredients: Incorporate seasonal fruits and vegetables like squash, pumpkins, apples, cranberries, and root vegetables. These ingredients pair well with warming spices and offer rich flavors that complement cooler weather.
- Offer seasonal specials: Limited-time dishes can create a sense of urgency and excitement. Consider adding specials that feature hearty soups, slow-cooked meats, and warm desserts to your fall menu.
- Update drink offerings: Craft seasonal beverages like spiced ciders, pumpkin-flavored cocktails, and warm lattes to reflect fall flavors and attract more customers.
2. Prepare for Changes in Customer Behavior
The transition from summer to fall often brings shifts in customer traffic. Cooler weather, the return to school, and holiday planning can all affect when and how customers choose to dine. Adjusting your operations to align with these changes can help you maximize customer satisfaction and profitability.
Our Recommended Strategies:
- Reevaluate your outdoor dining space: If your restaurant relies on outdoor seating, start planning for cooler weather by adding outdoor heaters or transitioning guests inside. Create a warm and inviting atmosphere both indoors and outdoors to accommodate diners.
- Adjust your hours: Depending on your location, you may notice shifts in foot traffic as the days grow shorter and school resumes. Consider adjusting your hours to reflect these changes, focusing on peak dining times for fall.
- Run weekday promotions: If you notice a drop in lunchtime or weekday traffic, offer discounts or special promotions to encourage midweek dining. A “Back-to-School” or “Fall Harvest” menu could entice customers to dine with you during slower times.
3. Focus on Seasonal Marketing
Fall brings several marketing opportunities that you can leverage to keep your restaurant top-of-mind. The season is full of themes, from harvest festivals to Halloween, making it a perfect time to introduce fall-themed promotions and events.
Our Recommended Strategies:
- Launch seasonal promotions: Highlight fall-inspired dishes and drinks on your social media channels and website. Create eye-catching campaigns that showcase the warmth and coziness of your fall offerings.
- Host fall-themed events: Organize events such as harvest dinners, Oktoberfest celebrations, or themed happy hours. These events can drive traffic and create buzz, helping your restaurant stand out during the season.
- Prepare for the holiday season early: As fall is the precursor to the holiday rush, begin marketing your restaurant as a venue for holiday parties and group events. Offer early booking incentives to secure reservations before the season ramps up.
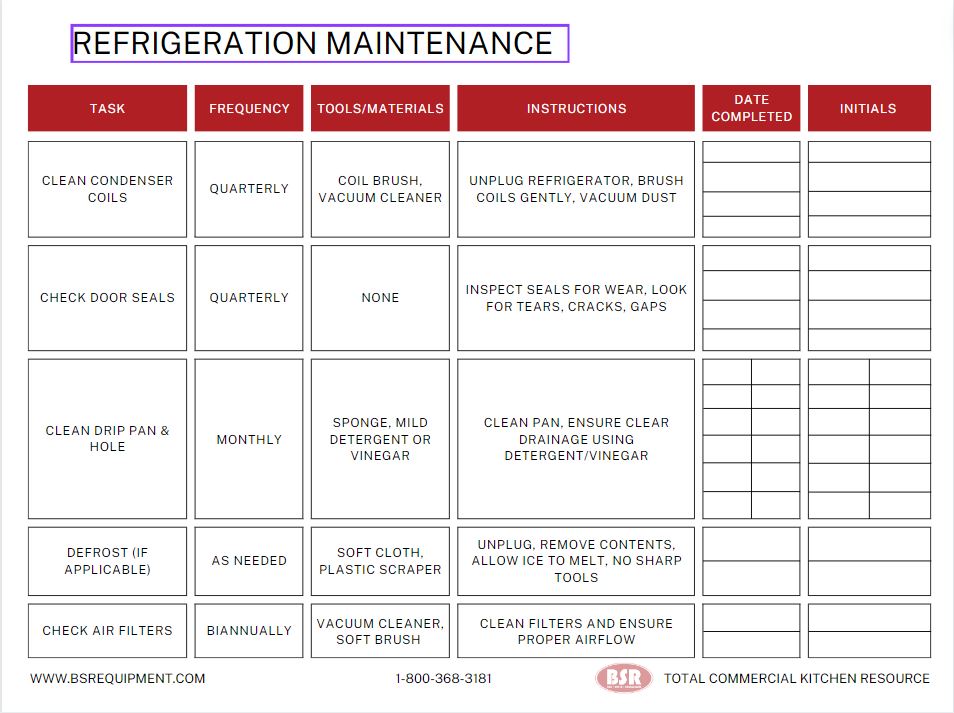
4. Ensure Your Equipment Is Ready for Cooler Weather
Fall can bring changes to how your kitchen operates, especially as you shift from lighter summer fare to heartier dishes that require different preparation techniques. Making sure your equipment is in peak condition will prevent costly disruptions and help you handle increased volume as you head into the busy holiday season.
Our Recommended Strategies:
- Perform routine maintenance: Before the fall rush, conduct maintenance checks on key kitchen equipment like ovens, grills, and refrigeration units. Ensure everything is in working order to avoid breakdowns during high-traffic periods.
- Upgrade if necessary: If you’ve been putting off equipment upgrades, now might be the time to invest in more efficient tools. Whether it’s a high-capacity oven or improved refrigeration, upgrading equipment can increase efficiency and reduce downtime.
To Wrap It Up… (like the blanket you’ll be needing here soon)
As the summer months draw nearer to its finale, we emphasize the urgency that with the cooler seasons ahead (and not terribly far off!) it’s imperative to start thinking about what changes need to be initiated. The transition from summer to fall is an ideal time for restaurant owners and other professionals in the world of food operations to reassess their business approaches and make necessary adjustments to meet various seasonal demands.
At BSR Design & Supplies, we’re committed to supporting restaurant owners, catering professionals, chefs, and aspiring food-driven entrepreneurs alike – as well as everyone in between – every step of the way. From high quality kitchen equipment to seasonal supplies, we have everything you need to succeed as you transition into fall and beyond.
All it takes is a quick call in at (800) 368-3181 or visit to one of our locations in Boise, Twin Falls, or Idaho Falls, and you’ll be on your way to improved operations in no time! Maybe even pumpkin-spiced ones, if you prefer.
Or better yet, shoot us an email at [email protected] if you would like to receive our weekly close-out lists.
We’re here and ready to start a conversation.